Technology Support Services
Page Navigation
- Wappingers Central School District
- Google MFA
-
What is Multi-Factor Verification?
Multi-Factor Verification (also known as two-factor authentication, 2FA, or MFA) is an enhanced security for your account. When you use multi-factor verification, you sign in with something you know (your password) and something you have (a code sent to your phone).
You can also set up extra codes for when you don't have your phone on you, and you can set your account to recognize computers so you only have to verify with multi-factor verification on new computers.
MFA Sign-in Options
Below are several options that you can use to set up your Google MFA. We recommend setting up at least one additional second step as a backup (in case your usual method isn’t possible - for example if you’ve left your phone at home or you don’t have a mobile phone signal!
- We do not recommend passkey or security keys because they will not work on your district devices. These keys require fingerprint, face, or screen lock identifiers. However, we do recommend the following:
How do I turn on Multi-Factor Verification?
You can turn on MFA from a computer or your phone. Directions for both are below. Scroll further down to find the instructions if you are using your phone.
From a computer:
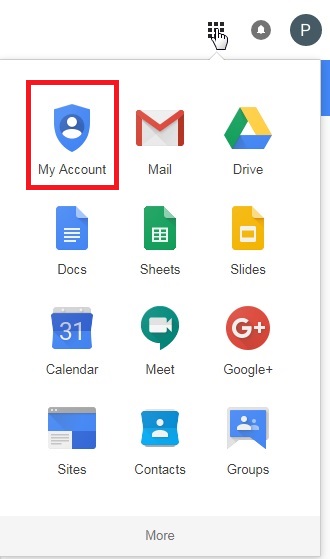
1. Log in to your account, click the application button (
 ) in the top right-hand corner of your browser. Then, click the "Account" icon.
2. Go to Security on the left-hand side and then go to How to sign in to Google, and look for 2-Step Verification. Select the option for Multi-Factor Verification and turn it on then follow the on-screen instructions to complete the setup process. You may be prompted to re-enter your password.
1. Phone Number
- This method delivers a passcode to your phone by text message or automated phone call.
- Your phone number will only be used for account security.
- It’s best to use a mobile phone number, as it’s a device you can carry with you. You may be able to use a direct line from the main office/principal's office or a landline.
- Please note, phone extensions do not work. It has to be a direct connect number.
- This method relies on your mobile signal - if you're in a location where you can't receive text messages or calls, you won't be able to receive a passcode.
2. Google Prompt
- Google prompts are push notifications you’ll receive on:
Android phones that are signed into your district Google account
iPhones or iPads with the Gmail, Google Search, Smart Lock, YouTube or Google Photos app installed and signed in to your district Google account.
- You will need to sign in on one on Android, iPhone or iPad first, before you can use it to receive Google prompts.
- You will also be prompted to add a backup MFA option, in case you're not able to receive a Google prompt.
This can be either:
-
- Passcodes sent to your phone by text message or automated phone call.
- A list of backup codes to keep somewhere safe, like a password manager
3. Google Authenticator
- Use an authenticator app on your phone (such as Google Authenticator) to generate verification codes.
- You can download Google Authenticator from the Google Play Store or the iOS App Store
- These codes can be generated even if your phone has no mobile signal or wifi.
4. Backup Codes
Generates a list of passcodes for you to keep in a safe place, such as a password manager. Each code can only be used once.
If you use all of your codes or lose them, then you can generate a new set of codes. The previous list of codes will then no longer work.
For a quick tutorial, click on the video above.
From your phone:
- Open your Gmail app from your phone.
- Click on your user icon in the upper right corner.
- Clock on "Google Account"
- Under your district email, you will be able to scroll through the menu until you find "Security"
- After clicking on "Security" scroll down until you find "How you sign into Google"
- This is where you will find 2-Step Verification. You must click on it and then turn it on.
- From there following the directions to set up 2-Step Verification.
Troubleshooting Google MFA
Before you can set up any of the other MFA options, you must first get the initial code via text or voicemail!
Once you have your initial verification set up, make sure you set up the other available options (push notification, authenicator, or backup codes).
- These options are not automatic. You must choose them separately.
If you are having difficultly using MFA, scroll down and click "try another option" which will allow you to use the other authentication options you have set up.
Updating Google MFA
After you've set up Google two-factor authentication, you can make any changes to your MFA settings at any time.
1. Sign in to your district Google account.
- If you are unable to sign in to your Google account, please contact the Help Desk.
2. Go to the 2-step verification options page in your Google account
- If you're signed in to more than one Google account, make sure the account you're currently accessing is your district account. You can check this by selecting your profile icon in the top-right corner.
3. You will be presented with a list of the authentication methods ("second steps") currently set up on your Google and a list of additional methods that you can set up.

